


This is an archived article that was published on sltrib.com in 2015, and information in the article may be outdated. It is provided only for personal research purposes and may not be reprinted.
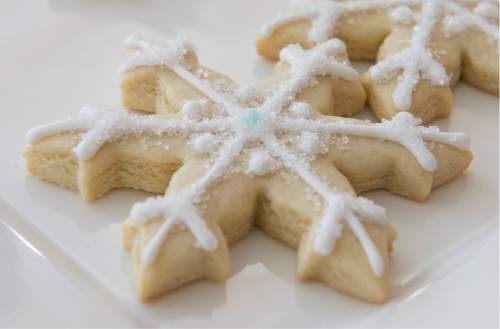
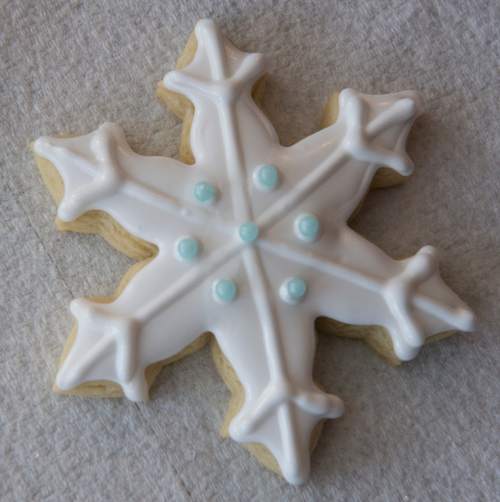
Sugar cookies cut into snowflakes, stars, mittens and other winter shapes are the most popular treats to bake, decorate — and eat — this time of year, making them our first choice to launch The Tribune's 12 Days of Cookies extravaganza.
Each day through Dec. 20, we will share a new holiday cookie recipe at http://www.sltrib.com/lifestyle/food .
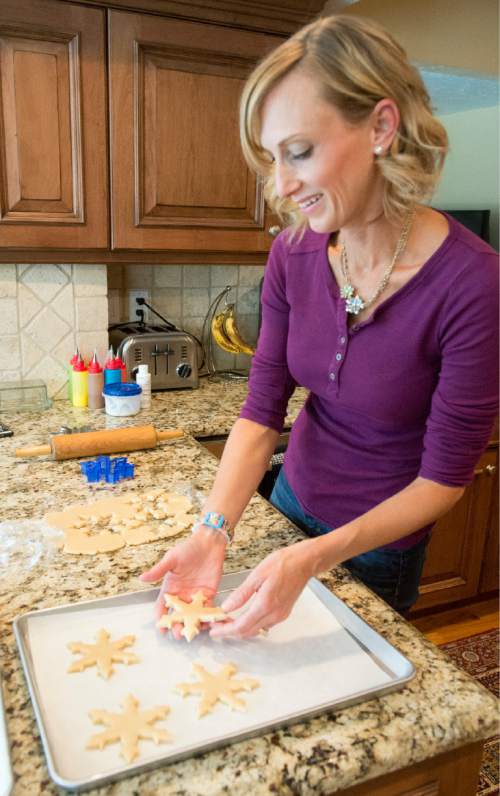
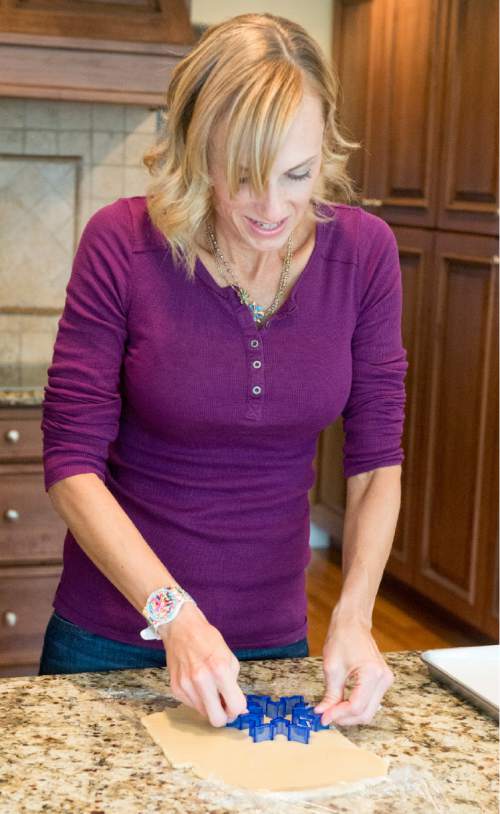
To get cooks primed for this Christmas baking marathon, we asked Kristen Fenton, owner of Just-Iced Cookies in Salt Lake City, to share her best sugar cookie baking and decorating tips.
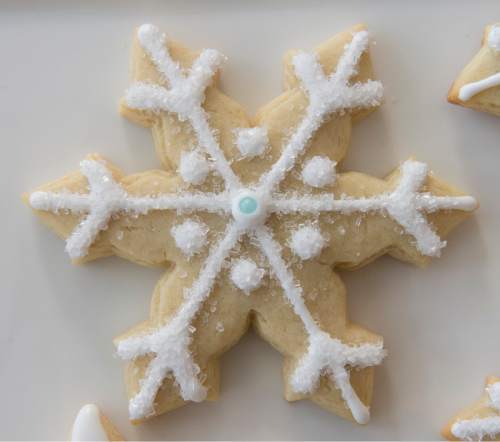
Fenton knows her stuff, as she recently represented Utah in Food Network Magazine's Sugar Cookie USA project. Cookie experts from around the country were asked to decorate a round sugar cookie inspired by their home state. The results are featured in the December 2015 issue now on newsstands. Of the two entries Fenton submitted, editors best liked her depiction of the lights on Temple Square. "It's the first thing that comes to mind when you think Christmas in Utah and what really differentiates us from other states," said Fenton. (Her other submission was a snowboarding Santa.)
Fenton, a Utah native and mother of four, has a commercial kitchen in her home and sells beautifully decorated sugar cookies at various festivals, fairs and art markets around the valley. Her sugar cookie recipe, which she shared here, has been in her family for many years and includes sour cream to make it extra soft.
Through trial and error and by reading magazines, websites and blogs, she has learned several tricks to ensure that the cookies hold their shape and turn out perfectly.
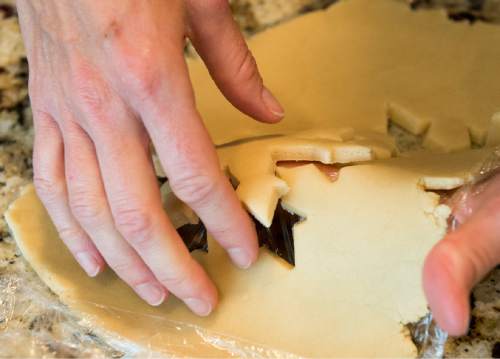
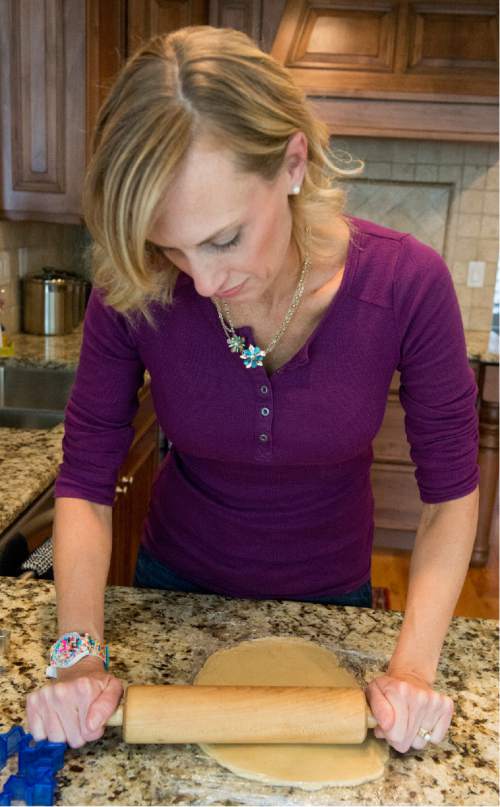
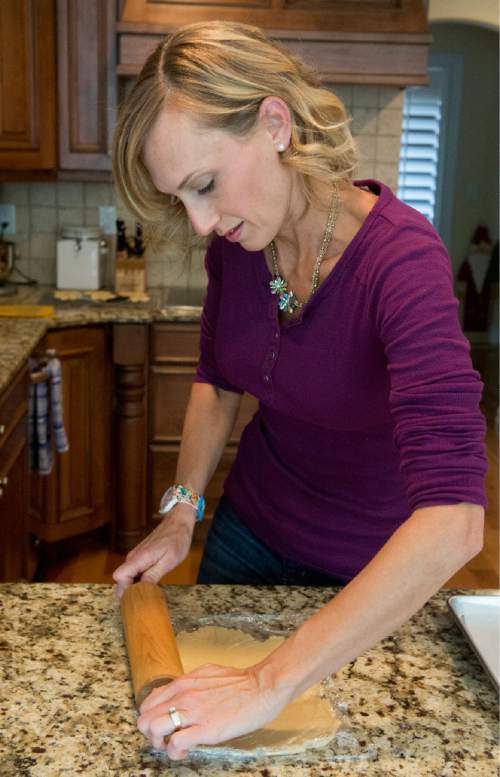
Her first suggestion: Chill the dough. But rather than sticking the whole ball in the fridge, divide it into four manageable portions and pre-roll each section between two sheets of plastic wrap. Roll it thicker than what you want the final cookies to be, before stacking in the fridge for several hours or overnight.
"I'm a huge believer in chilling the dough before you roll it out," she said. "The cookies tend to hold their shape and are easier to cut."
When ready to cut, pull a flattened disc of dough from the fridge and roll it to the desired thickness while still in the plastic. "The wrap eliminates the need to add additional flour, which can make the dough tough," she said. "Plus [the wrap] makes a lot less mess."
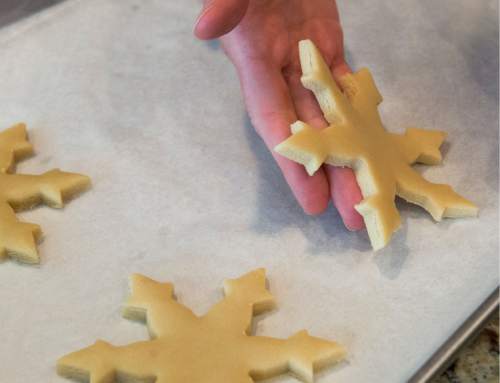
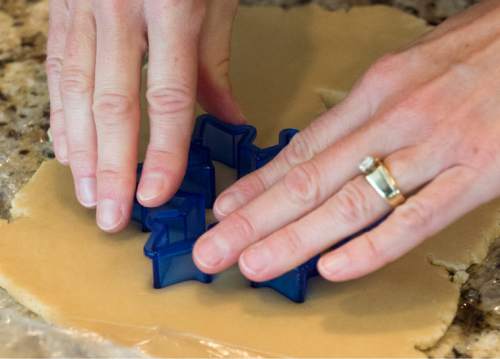
After cutting the dough into shapes, be sure to place the cookies on sheet pans lined with parchment paper to prevent sticking (there's more on this strategy in the accompanying list of tips). Just before baking, Fenton returns her tray of cookies to the fridge for a quick 10- to 15-minute chill while the oven preheats.
That brings us to the oven temperature. Fenton believes all cooks should invest in an oven thermometer, because even though you may set your oven to 375 degrees, it's probably hotter or cooler. And even with a thermometer, she likes to turn the trays of cookies halfway through baking to ensure even baking.
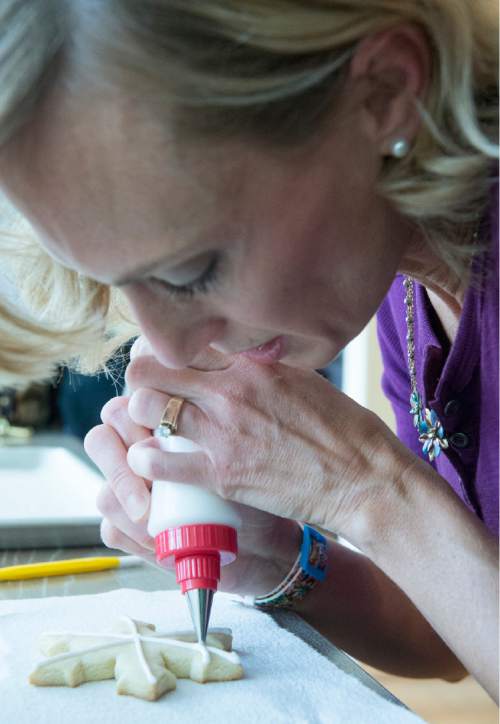
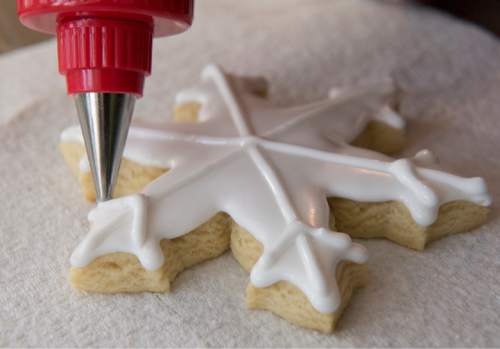
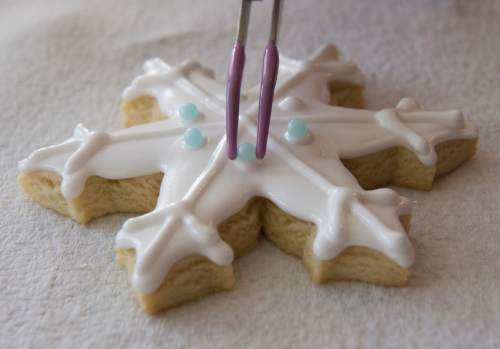
When it comes to decorating, Fenton uses a royal icing with a few drops of food gel. "The gels are more vibrant than regular food coloring and a little goes a long way."
She also finds decorating easier with squeeze bottles that come with different-size decorating tips. "I know a lot of cookie decorators use pastry bags, but I've just found that squeeze bottles are easier for piping, especially if you're a beginner."
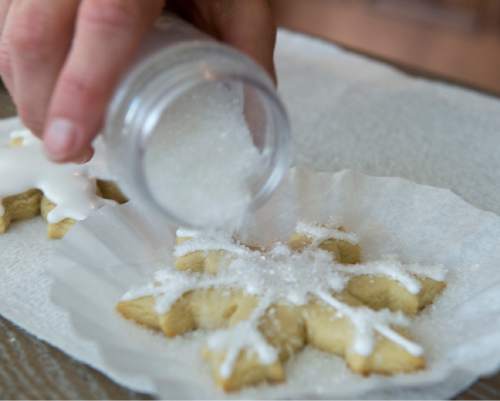
And one more tip to save time and money: After frosting, put the cookies inside a coffee filter before dusting with sugar or sprinkles. "It keeps the decorations from going all over the place, and you can pour the extras back into the bottle."
kathys@sltrib.com Want more help?
No matter how ambitious your holiday cookie baking plans are, chances are good you won't be cranking out the massive quantities most professional bakers are prepping for this holiday season. But that doesn't mean you can't borrow — and benefit from — their pro-grade tips that help them turn mountains of dough into armies of cookies. So we've assembled the best tips and tricks professional bakers use and show you how to put them into play at home.
Freshness counts • If you don't bake often, your baking soda and baking powder may be past their prime. And that means your cookies won't have the right puff. If you can't recall when you bought them, splurge on new ones. Or test them by combining a little with vinegar. If the mixture gets foamy, you're good to go. You also want to check your ingredients for rancidity. Nuts, seeds and some flours can turn rancid, meaning the fats have gone bad. Test nuts and seeds by taste before you put them in your cookies. If they have a funky or off taste, toss them. Rancid flours will smell off, so just take a whiff. And the best way to prevent this is to store whole-grain flours, nuts and seeds in the freezer in a zip-close plastic bags.
Pay attention to temperature • Temperature can play a variety of roles in a recipe (beyond just setting your oven correctly). Butter simply cannot cream correctly if it's too cold or too warm. So if a recipe calls for softened butter, you want it to hold its shape, but yield when pressed on. And proper creaming of the butter and sugar is critical to the finished texture of your cookies.
On the other hand, if a recipe calls for chilling a dough, do it and don't try to rush it. It's there for a reason. Some doughs are too soft at room temperature and need to be chilled so they are easier to handle or roll out. Other doughs will lose their shape if placed from room temperature into a hot oven.
Scrape the bowl • You know the part of the recipe that says to scrape your bowl between additions? Do it. It's important. If you don't scrape the bowl, it's likely that your dough won't be properly mixed. You might end up with a chunk of unmixed butter or sugar, or a smear of egg white, in your dough. Or even worse, you could get a hunk of creamed butter and sugar that hasn't been mixed into the flour, resulting in a big streak of crispy and unsightly burnt edge.
Portion the dough evenly • If your cookies are evenly sized, they're more likely to bake evenly. For drop cookies, your best bet is to use a cookie scoop. These look like an ice cream scoop, but have a thumb- or other squeeze-activated bar inside the scoop to help dislodge the dough. They are the best way to get your drop cookies evenly sized. You can find them online and at most kitchen shops. (And in the off-season, use them for ice cream.)
For slice-and-bake refrigerator cookies, the key is to turn your dough log a quarter turn after every slice. This keeps the log from losing its shape, and that keeps the cookies round.
Wet your hands • When you're working with a soft or sticky dough, it can be difficult to move it from the bowl to the counter or pan. But if you moisten your hands lightly with a bit of water, the dough won't stick as much. This works especially well for spreading bars or brownies in a pan, but also if you're trying to wrap rounds of dough to go in the refrigerator.
Make dough disc, not ball • Most drop cookies should be slightly flattened once the dough balls are arranged on the baking sheet. This helps the cookies bake evenly so the centers aren't still doughy when the edges are done. Pressing each ball gently with the underside of a drinking glass or a moistened palm is a good way to do this.
Embrace kitchen parchment • Kitchen parchment (also called baking parchment or parchment paper) is paper treated to be nonstick and heat-safe. It works wonders preventing your cookies from sticking to the pan, and also makes your cleanup much easier. You can find it alongside the foil at the grocer and it comes as sheets or rolls.
Don't flour your cut-out cookies • When you're going to roll out dough for cut-out cookies, you often turn out the dough onto a floured surface, then sprinkle it with more flour as you roll it flat. Stop it. Rolling the dough between sheets of kitchen parchment eliminates all this extra flour from being worked into the dough. It also allows you to re-roll the scraps more times without making the cookies unpleasantly tough. If the dough sticks a little to the parchment, pop it into the refrigerator or freezer to make sure it is nice and cold before peeling the paper off.
Cool your pans • If you're baking more than one pan of cookies, make sure to let the pans cool between batches. Remember how that dough needs to be the right temperature before it goes in the oven? If you put it on a hot pan, the bottoms of the dough will get melty and the cookies will spread too much during baking.
Freeze extra dough • Maybe you don't want a huge pile of cookies lying around the house (because you might eat them all at once). Or maybe you want to prep your cookie supply so you can bake off a few at a time later. The solution is the freezer. Most cookie doughs freeze beautifully. Slice and bake cookies should be frozen, well wrapped, as a whole log. Just bring back to refrigerator temperature before slicing.
Drop cookies can be scooped into balls and frozen, then transferred to a zip-top plastic bag for storage. Cut-out cookie dough can be shaped into disks, then wrapped in plastic and frozen, then rolled out on another day (works great for pie dough, too).
Freeze extra cookies • While freshly baked cookies definitely are better, if you bake too many cookies the freezer still can be your friend. Make sure you freeze your cookies before decorating them. The best option is in an airtight container to help prevent breaking. And separate layers of cookies with sheets of kitchen parchment or waxed paper to prevent them from sticking together. Unfrosted bars can be frozen right in the pan. Cookies with a very high sugar content (such as Florentines or other lace cookies) don't do well in the freezer. You'll just need to eat those.
The Associated Press